Activity is one of the most brilliant concept on Android from its well-design architecture on memory management which lets Multitasking works perfectly on this most popular mobile operating system.
Anyway, Activity is not just to be launched on the screen. The way it is launched is also concerned. There are so many details in this topic. One of those that is really important is
launchMode, which is the one that we are going to talk about in this blog.
Since each Activity is made to work in different purpose. Some is designed to work separately with each Intent sent for example an Activity for email composing in email client. While some is designed to work as a singleton for example an email's inbox Activity.
That's why it does matter to specify whether Activity is needed to be created a new one or to use the existed one, or it may leads to the bad UX or malfunctional. Thanks to Android's core engineer. It is the way easy to make it done with some help of launchMode which is designed for this especially.
Assign a launchMode
Basically we could assign a launchMode directly as an attribute of <activity> tag inside AndroidManifest.xml file list this:
<activity
    android:name=".SingleTaskActivity"
    android:label="singleTask launchMode"
    android:launchMode="singleTask">
There are 4 types of launchMode available. Let's see it one by one.
standard
This is the default mode.
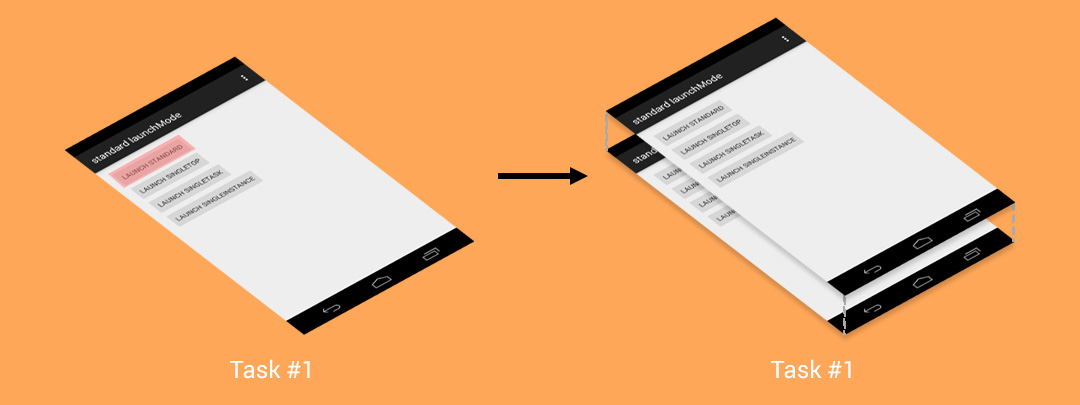
The behavior of Activity set to this mode is a new Activity will always be created to work separately with each Intent sent. Imagine, if there are 10 Intents sent to compose an email, there should be 10 Activities launch to serve each Intent separately. As a result, there could be an unlimited number of this kind of Activity launched in a device.
Behavior on Android pre-Lollipop
This kind of Activity would be created and placed on top of stack in the same task as one that sent an Intent.
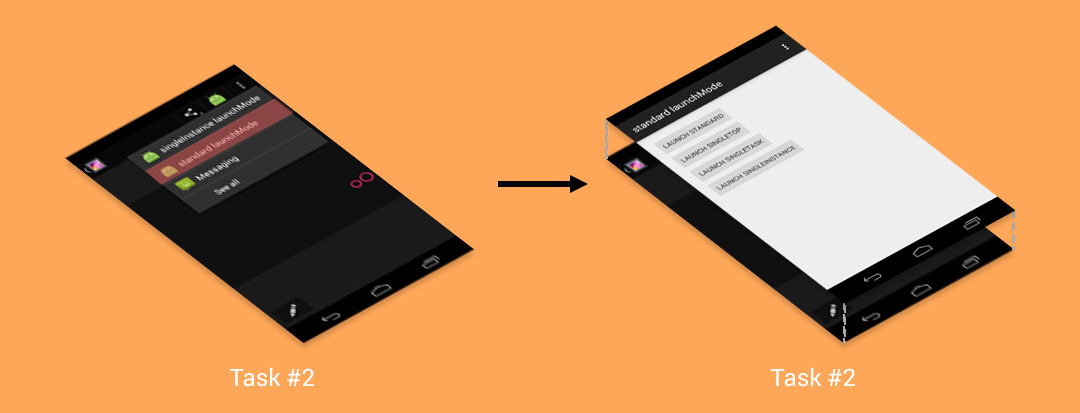
An image below shows what will happen when we share an image to a standard Activity. It will be stacked in the same task as described although they are from the different application.
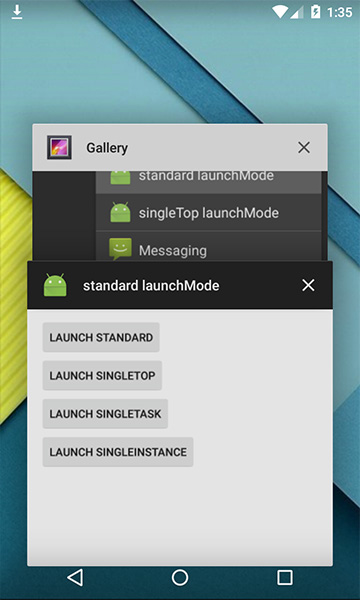
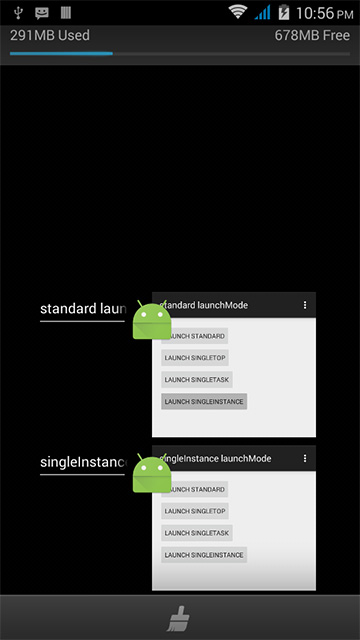
And this is what you will see in the Task Manager. (A little bit weird may be)
If we switch the application to the another one and then switch back to Gallery, we will still see that standard launchMode place on top of Gallery's task. As a result, if we need to do anything with Gallery, we have to finish our job in that additional Activity first.
Behavior on Android Lollipop
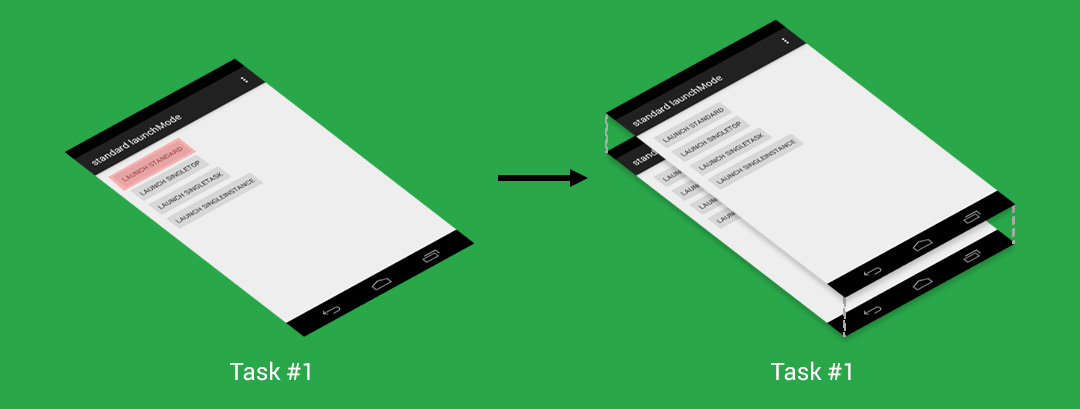
If those Activities are from the same application, it will work just like on pre-Lollipop, stacked on top of the task.
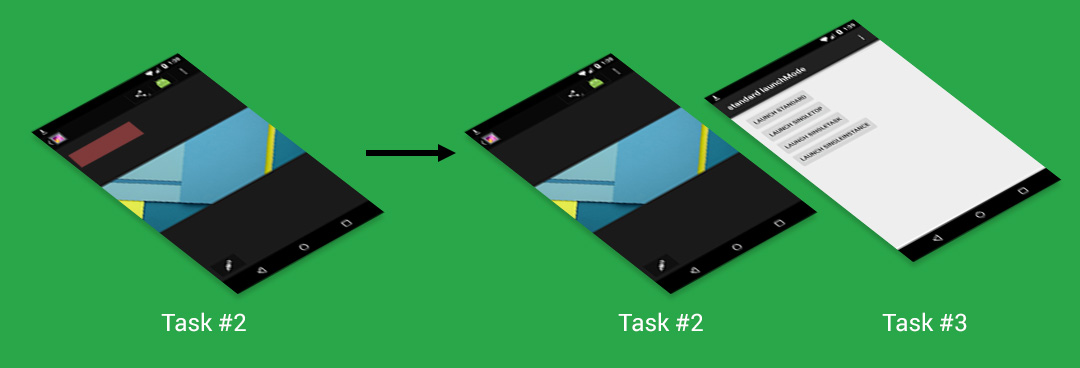
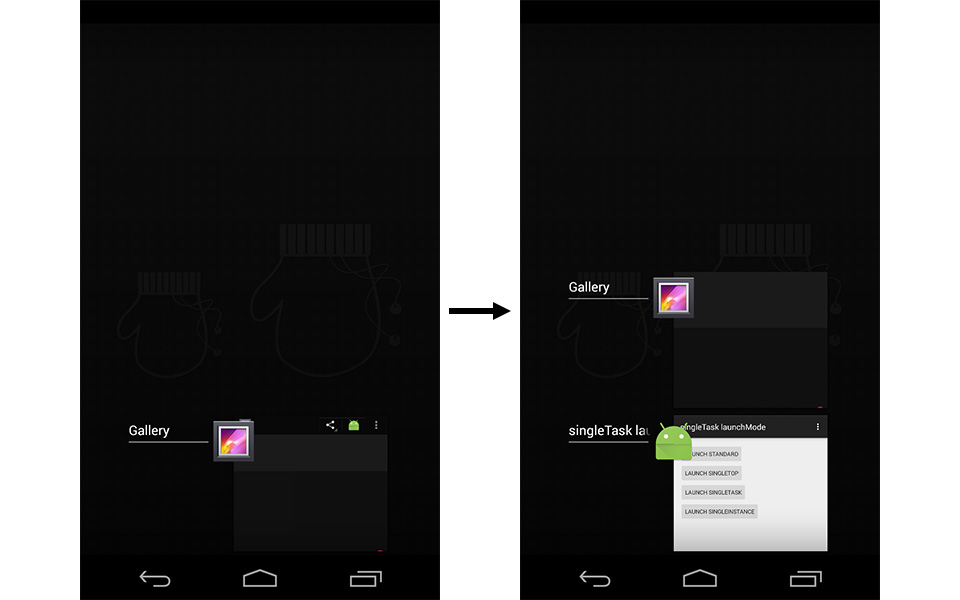
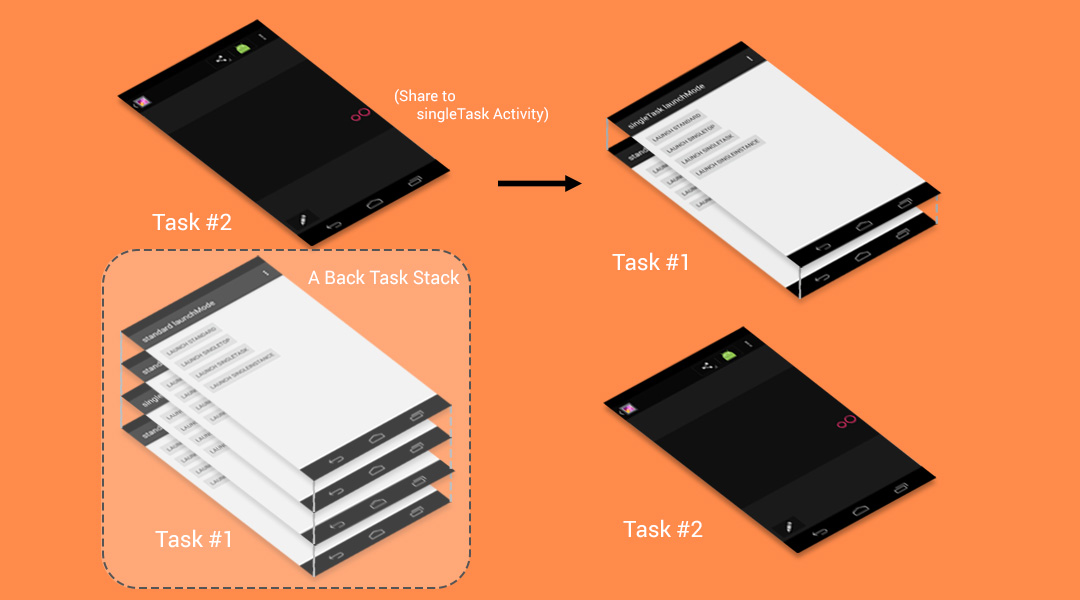
But in case that an Intent is sent from a different application. New task will be created and the newly created Activity will be placed as a root Activity like below.
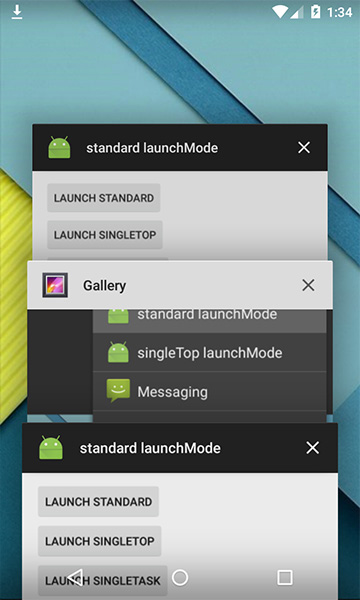
And this is what you will see in Task Manager.
This happens because Task Management system is modified in Lollipop to make it better and more make sense. In Lollipop, you can just switch back to Gallery since they are in the different Task. You can fire another Intent, a new Task will be created to serve an Intent as same as the previous one.
An example of this kind of Activity is a Compose Email Activity or a Social Network's Status Posting Activity. If you think about an Activity that can work separately to serve an separate Intent, think about standard one.
singleTop
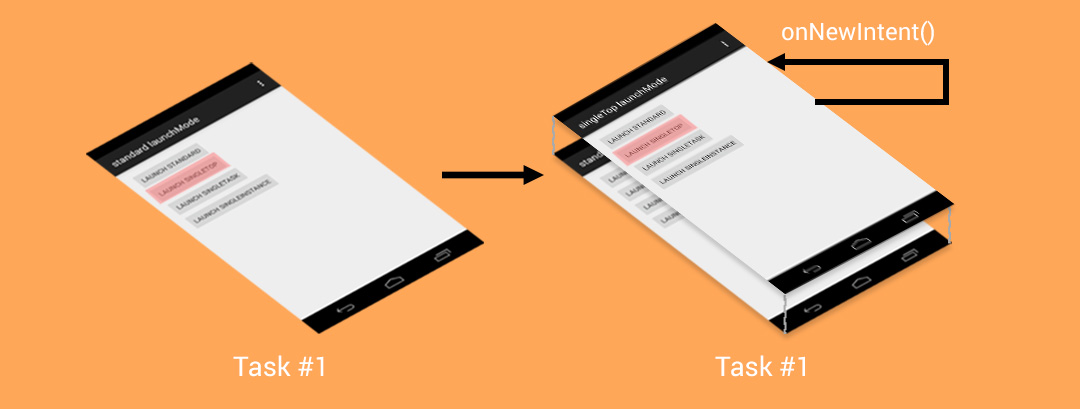
The next mode is singleTop. It acts almost the same as standard one which means that singleTop Activity instance could be created as many as we want. Only difference is if there already is an Activity instance with the same type at the top of stack in the caller Task, there would not be any new Activity created, instead an Intent will be sent to an existed Activity instance through onNewIntent()method.
In singleTop mode, you have to handle an incoming Intent in both onCreate() and onNewIntent()to make it works for all the cases.
A sample use case of this mode is a Search function. Let's think about creating a search box which will lead you to a SearchActivity to see the search result. For better UX, normally we always put a search box in the search result page as well to enable user to do another search without pressing back.
Now imagine, if we always launch a new SearchActivity to serve new search result, 10 new Activities for 10 searching. It would be extremely weird when you press back since you have to press back for 10 times to pass through those search result Activities to get back to your root Activity.
Instead, if there is SearchActivity on top of stack, we better send an Intent to an existed Activity instance and let it update the search result. Now there will be only one SearchActivity placed on top of stack and you can simply press just back button for a single time to get back to previous Activity. Makes a lot more sense now.
Anyway singleTop works with the same task as caller only. If you expect an Intent to be sent to an existed Activity placed on top of any other Task, I have to disappoint you by saying that it doesn't work that way. In case Intent is sent from another application to an singleTop Activity, a new Activity would be launched in the same aspect as standard launchMode (pre-Lollipop: placed on top of the caller Task, Lollipop: a new Task would be created).
singleTask
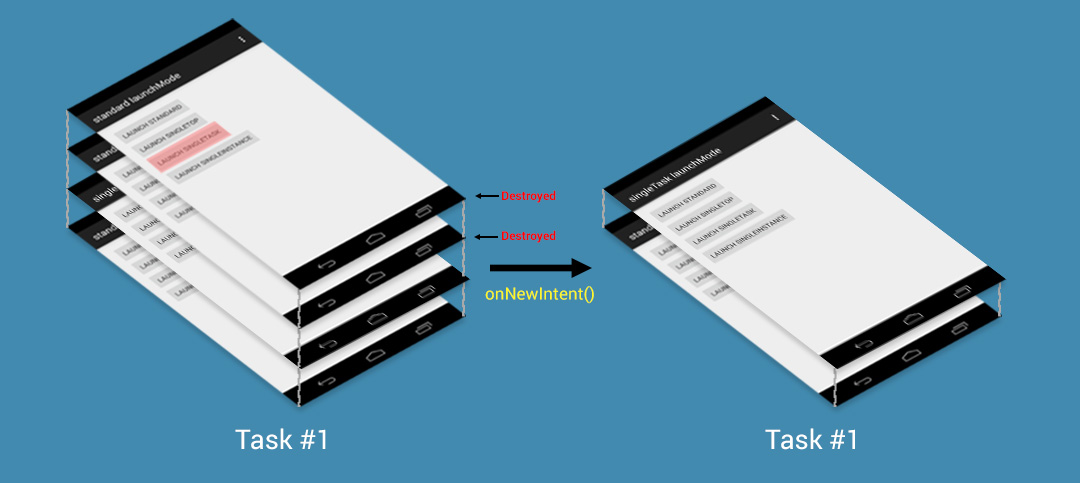
This mode is quite different from standard and singleTop. An Activity with singleTask launchMode is allowed to have only one instance in the system (a.k.a. Singleton). If there is an existed Activity instance in the system, the whole Task hold the instance would be moved to top while Intent would be delivered through onNewIntent() method. Otherwise, new Activity would be created and placed in the proper Task.
Working in the same application
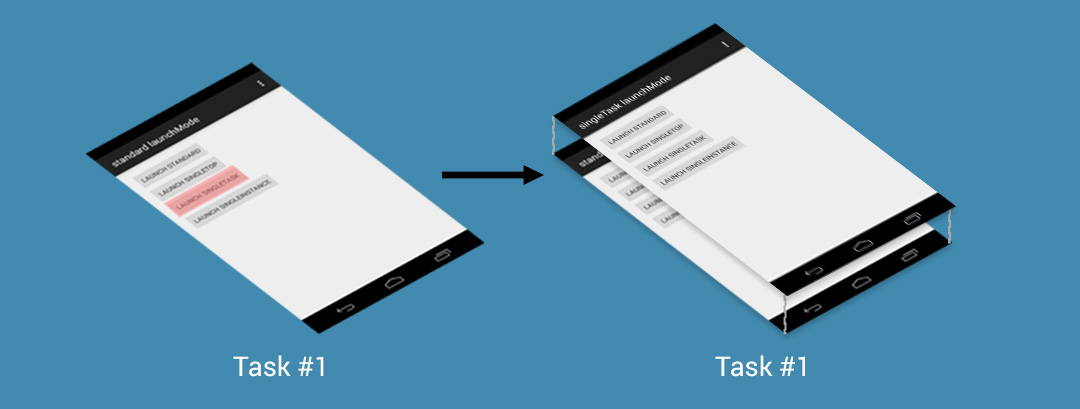
If there is no that singleTask Activity instance existed in the system yet, new one would be created and simply placed on top of stack in the same Task.
But if there is an existed one, all of Activities placed above that singleTask Activity would be automatically and cruelly destroyed in the proper way (lifecycle trigged) to make that an Activity we want to appear on top of stack. In the mean time, an Intent would be sent to the singleTask Activity through the lovely onNewIntent() method.
Doesn't make a good sense in term of user experience but it is designed this way ...
You may notice one thing that it is mentioned in
document that
The system creates a new task and instantiates the activity at the root of the new task.
But from the experiment, it doesn't seem to work as described. A singleTask Activity still stack up on top of the Task's Activity stack as we can see from what dumpsys activity command shows up.
Task id #239
  TaskRecord{428efe30 #239 A=com.thecheesefactory.lab.launchmode U=0 sz=2}
  Intent { act=android.intent.action.MAIN cat=[android.intent.category.LAUNCHER] flg=0x10000000 cmp=com.thecheesefactory.lab.launchmode/.StandardActivity }
    Hist #1: ActivityRecord{429a88d0 u0 com.thecheesefactory.lab.launchmode/.SingleTaskActivity t239}
      Intent { cmp=com.thecheesefactory.lab.launchmode/.SingleTaskActivity }
      ProcessRecord{42243130 18965:com.thecheesefactory.lab.launchmode/u0a123}
    Hist #0: ActivityRecord{425fec98 u0 com.thecheesefactory.lab.launchmode/.StandardActivity t239}
      Intent { act=android.intent.action.MAIN cat=[android.intent.category.LAUNCHER] flg=0x10000000 cmp=com.thecheesefactory.lab.launchmode/.StandardActivity }
      ProcessRecord{42243130 18965:com.thecheesefactory.lab.launchmode/u0a123}
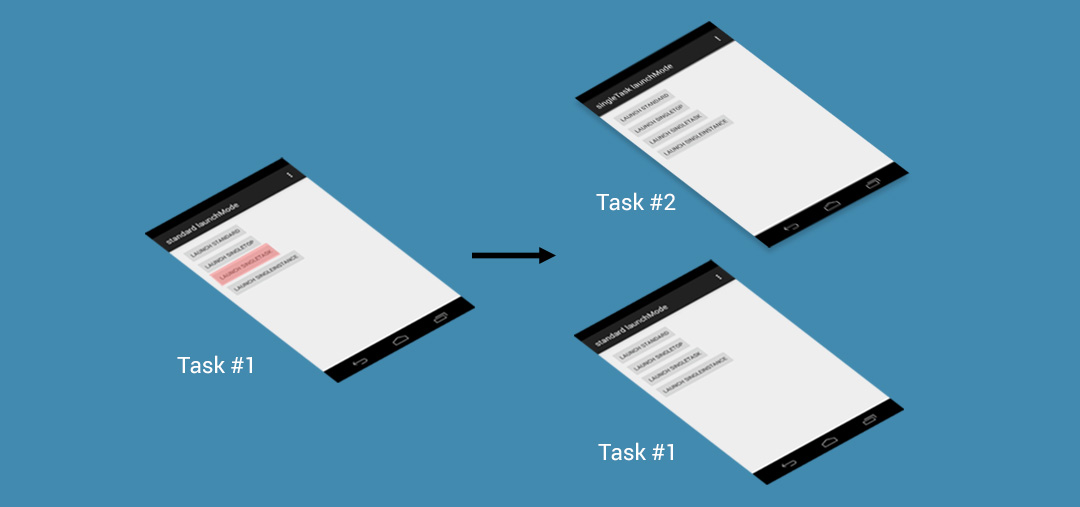
If you wish to to let a singleTask Activity acts like described in document: create a new Task and put an Activity as a root Activity. You need to assign taskAffinity attribute to the singleTask Activity like this.
<activity
    android:name=".SingleTaskActivity"
    android:label="singleTask launchMode"
    android:launchMode="singleTask"
    android:taskAffinity="">
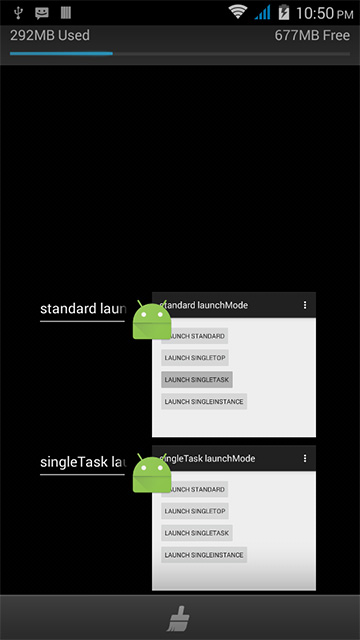
This is a result when we try to launch SingleTaskActivity.
It's your job to consider whether to use taskAffinity or not by the behavior of the Activity.
Collaborate with another application
Once an Intent is sent from another application and there is no any Activity instance created in the system yet, new Task would be created with a newly created Activity placed as a root Activity.
Unless there is a Task of the application that is an owner of the calling singleTask Activity existed, a newly created Activity would be placed on top of it instead.
In case that there is an Activity instance existed in any Task, the whole Task would be moved to top and every single Activity placed above the singleTask Activity will be destroyed with lifecycle. If back button is pressed, user has to travel through the Activities in the stack before going back to the caller Task.
A sample use case of this mode is any Entry Point Activity for example Email Client's Inbox page or Social Network's Timeline. Those Activities are not designed to have more than one instance so singleTask would do a job perfectly. Anyway you have to use this mode wisely since Activities could be destroyed without user's acknowledgement in this mode like described above.
singleInstance
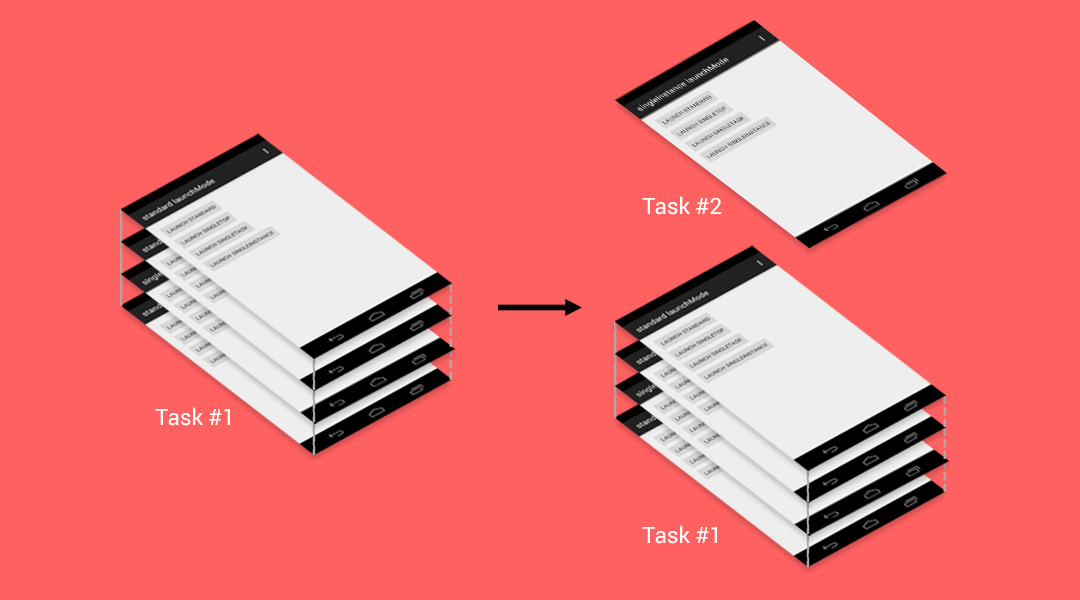
This mode is quite close to singleTask, only single instance of Activity could be existed in the system. The difference is Task hold this Activity could have only one Activity, the singleInstance one.If another Activity is called from this kind of Activity, a new Task would be automatically created to place that new Activity. Likewise, if singleInstance Activity is called, new Task would be created to place the Activity.
Anyway the result is quite weird. From the information provided by dumpsys, it appears that there are two Tasks in the system but there is only one appeared in Task Manager depends on which is latest one that is moved to top. As a result, although there is a Task that is still working in the background but we couldn't switch it back to foreground. Doesn't make any sense at all.
This is what that happened when singleInstance Activity is called while there already is some Activity existed in the stack.
But this is what we see from Task Manager.
Since this Task could has only one Activity, we couldn't switch back to Task #1 anymore. Only way to do so is to relaunch the application from launcher but it appears that the singleInstance Task would be hidden in the background instead.
Anyway there is some workaround for the issue. Just like we did with singleTask Acvity, simply assign a taskAffinity attribute to the singleInstance Activity to enable multiple Tasks on Task Manager.
<activity
    android:name=".SingleInstanceActivity"
    android:label="singleInstance launchMode"
    android:launchMode="singleInstance"
    android:taskAffinity="">
It makes more sense now.
This mode is rarely used. Some of the real use case is an Activity for Launcher or the application that you are 100% sure there is only one Activity. Anyway I suggest you not to use this mode unless it is really necessary.
Intent Flags
Beside from assigning the launch mode directly in AndroidManifest.xml, we are also able to assign more behavior through thing called Intent Flags, for example:
Intent intent = new Intent(StandardActivity.this, StandardActivity.class);
intent.addFlags(Intent.FLAG_ACTIVITY_SINGLE_TOP);
startActivity(intent);
would launch a StandardActivity with singleTop launchMode condition.
There are quite a lot of Flags you can play with. You could find more about it at
Intent.
Hope you find this article useful =)
Source : s.id/Sdh


